Docker Registry V2浅析

如果你有一下需求,请阅读本文:

  • 想要理解Docker Registry V2认证机制
  • 想要根据自己的业务构建企业级镜像仓库
  • 想要理解Haboar这类工具的实现方式,不甘只是工具的使用者

Docker Registry V2的认证过程

首先我们来了解一下当我们尝试从docker registry拉取镜像时实际的流程是什么样的?如下图所示

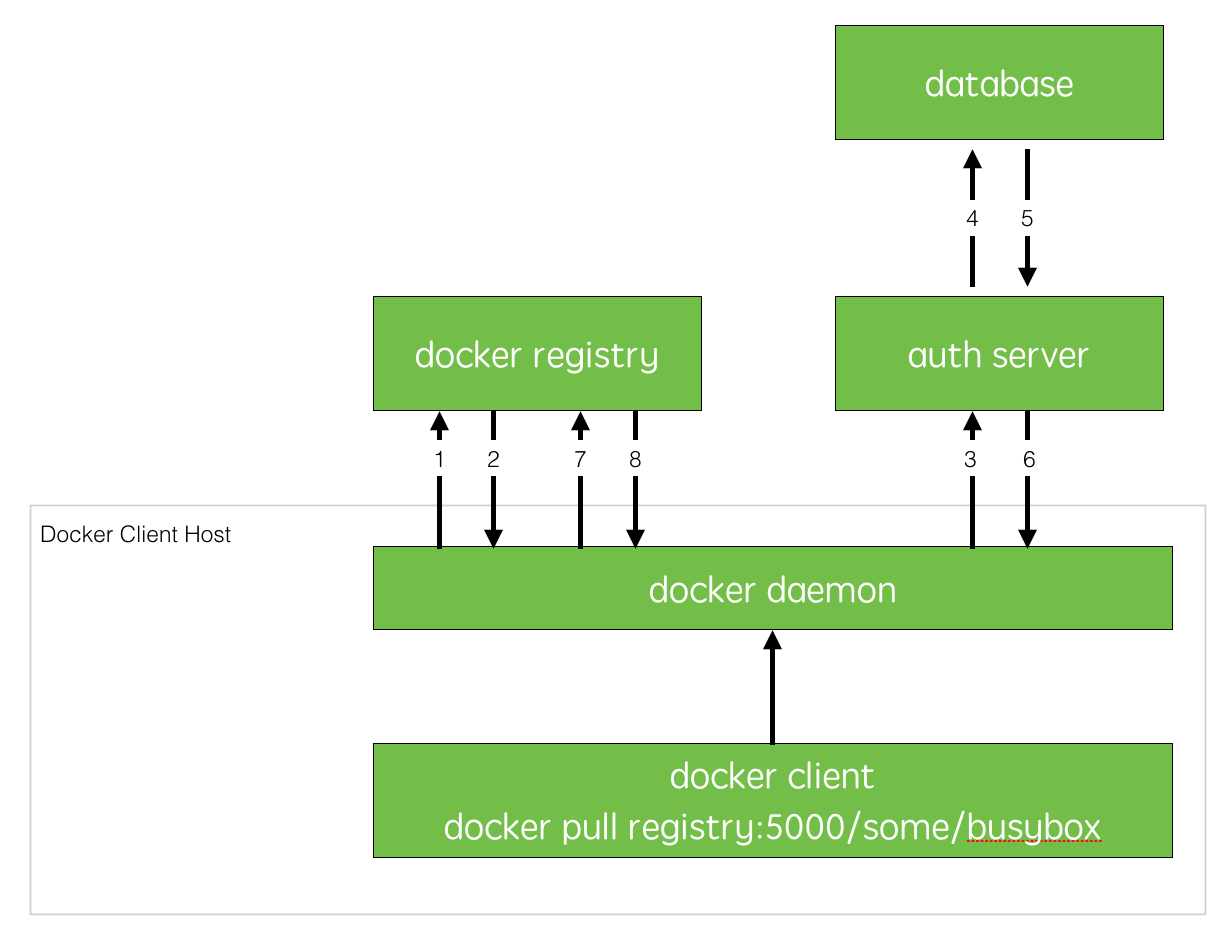
  1. docker daemon尝试从docker registry拉取镜像;
  2. 如果docker registry需要进行授权时,registry将会放回401 Unauthorized响应,同时在返回的头信息中包含了docker client如何进行认证的信息
  3. docker client根据registry返回的信息,向auth server发送请求获取认证token
  4. auth server则根据自己的业务实现去验证提交的用户信息查询用户数据仓库中是否存在相关信息(数据库或者LDAP)
  5. 用户数据仓库返回用户的相关信息
  6. auth server将会根据查询的用户信息,生成token令牌,以及当前用户所具有的相关权限信息
  7. docker client携带auth server返回的token令牌再次尝试访问docker registry.
  8. docker registry验证用户提交的token令牌信息,通过后则开始镜像的pull或者push动作

配置并启用Docker Registry启用用户认证

默认情况下docker registry将会从/etc/docker/registry/config.yml读取所有的配置信息。

完整的registry配置信息如下:

1
2
3
4
5
6
7
8
9
10
11
12
13
14
15
16
17
18
19
20
21
22
23
24
25
26
27
28
29
30
31
32
33
34
35
36
37
38
39
40
41
42
43
44
45
46
47
48
49
50
51
52
53
54
55
56
57
58
59
60
61
62
63
64
65
66
67
68
69
70
71
72
73
74
75
76
77
78
79
80
81
82
83
84
85
86
87
88
89
90
91
92
93
94
95
96
97
98
99
100
101
102
103
104
105
106
107
108
109
110
111
112
113
114
115
116
117
118
119
120
121
122
123
124
125
126
127
128
129
130
131
132
133
134
135
136
137
138
139
140
141
142
143
144
145
146
147
148
149
150
151
152
153
154
155
156
157
158
159
160
161
162
163
164
165
166
167
168
169
170
171
172
173
174
175
176
177
178
179
180
181
182
183
184
185
186
187
188
189
190
191
192
193
version: 0.1
log:
level: debug
formatter: text
fields:
service: registry
environment: staging
hooks:
- type: mail
disabled: true
levels:
- panic
options:
smtp:
addr: mail.example.com:25
username: mailuser
password: password
insecure: true
from: sender@example.com
to:
- errors@example.com
loglevel: debug # deprecated: use "log"
storage:
filesystem:
rootdirectory: /var/lib/registry
maxthreads: 100
azure:
accountname: accountname
accountkey: base64encodedaccountkey
container: containername
gcs:
bucket: bucketname
keyfile: /path/to/keyfile
rootdirectory: /gcs/object/name/prefix
chunksize: 5242880
s3:
accesskey: awsaccesskey
secretkey: awssecretkey
region: us-west-1
regionendpoint: http://myobjects.local
bucket: bucketname
encrypt: true
keyid: mykeyid
secure: true
v4auth: true
chunksize: 5242880
rootdirectory: /s3/object/name/prefix
swift:
username: username
password: password
authurl: https://storage.myprovider.com/auth/v1.0 or https://storage.myprovider.com/v2.0 or https://storage.myprovider.com/v3/auth
tenant: tenantname
tenantid: tenantid
domain: domain name for Openstack Identity v3 API
domainid: domain id for Openstack Identity v3 API
insecureskipverify: true
region: fr
container: containername
rootdirectory: /swift/object/name/prefix
oss:
accesskeyid: accesskeyid
accesskeysecret: accesskeysecret
region: OSS region name
endpoint: optional endpoints
internal: optional internal endpoint
bucket: OSS bucket
encrypt: optional data encryption setting
secure: optional ssl setting
chunksize: optional size valye
rootdirectory: optional root directory
inmemory: # This driver takes no parameters
delete:
enabled: false
redirect:
disable: false
cache:
blobdescriptor: redis
maintenance:
uploadpurging:
enabled: true
age: 168h
interval: 24h
dryrun: false
readonly:
enabled: false
auth:
silly:
realm: silly-realm
service: silly-service
token:
realm: token-realm
service: token-service
issuer: registry-token-issuer
rootcertbundle: /root/certs/bundle
htpasswd:
realm: basic-realm
path: /path/to/htpasswd
middleware:
registry:
- name: ARegistryMiddleware
options:
foo: bar
repository:
- name: ARepositoryMiddleware
options:
foo: bar
storage:
- name: cloudfront
options:
baseurl: https://my.cloudfronted.domain.com/
privatekey: /path/to/pem
keypairid: cloudfrontkeypairid
duration: 3000s
storage:
- name: redirect
options:
baseurl: https://example.com/
reporting:
bugsnag:
apikey: bugsnagapikey
releasestage: bugsnagreleasestage
endpoint: bugsnagendpoint
newrelic:
licensekey: newreliclicensekey
name: newrelicname
verbose: true
http:
addr: localhost:5000
prefix: /my/nested/registry/
host: https://myregistryaddress.org:5000
secret: asecretforlocaldevelopment
relativeurls: false
tls:
certificate: /path/to/x509/public
key: /path/to/x509/private
clientcas:
- /path/to/ca.pem
- /path/to/another/ca.pem
letsencrypt:
cachefile: /path/to/cache-file
email: emailused@letsencrypt.com
debug:
addr: localhost:5001
headers:
X-Content-Type-Options: [nosniff]
notifications:
endpoints:
- name: alistener
disabled: false
url: https://my.listener.com/event
headers: <http.Header>
timeout: 500
threshold: 5
backoff: 1000
redis:
addr: localhost:6379
password: asecret
db: 0
dialtimeout: 10ms
readtimeout: 10ms
writetimeout: 10ms
pool:
maxidle: 16
maxactive: 64
idletimeout: 300s
health:
storagedriver:
enabled: true
interval: 10s
threshold: 3
file:
- file: /path/to/checked/file
interval: 10s
http:
- uri: http://server.to.check/must/return/200
headers:
Authorization: [Basic QWxhZGRpbjpvcGVuIHNlc2FtZQ==]
statuscode: 200
timeout: 3s
interval: 10s
threshold: 3
tcp:
- addr: redis-server.domain.com:6379
timeout: 3s
interval: 10s
threshold: 3
proxy:
remoteurl: https://registry-1.docker.io
username: [username]
password: [password]
compatibility:
schema1:
signingkeyfile: /etc/registry/key.json

在本文当中我们主要关注auth部分配置

1
2
3
4
5
6
7
8
9
10
11
12
auth:
silly:
realm: silly-realm
service: silly-service
token:
realm: token-realm
service: token-service
issuer: registry-token-issuer
rootcertbundle: /root/certs/bundle
htpasswd:
realm: basic-realm
path: /path/to/htpasswd

auth配置部分是可选的,docker registry当前支持3种认证实现方式:silly,token,htpasswd;registry默认不开启auth配置。用户可以自定义其中一种实现来完成registry的认证配置。

我们有两种方式可以实现自定义配置:

  1. 创建新的config.xml,并覆盖默认配置
1
2
3
docker run -d -p 5000:5000 --restart=always --name registry \
-v `pwd`/config.yml:/etc/docker/registry/config.yml \
registry:2
  1. 使用环境变量覆盖默认registry配置,以docker-compose为例:
1
2
3
4
5
6
7
8
9
10
11
12
13
14
15
registry:
ports:
- 5000:5000/tcp
image: registry:2
volumes:
- "./certs:/certs:ro"
- "./registry/storage:/var/lib/registry:rw"
environment:
- REGISTRY_AUTH=token
- REGISTRY_AUTH_TOKEN_REALM=http://172.16.137.217:8080/auth
- REGISTRY_AUTH_TOKEN_SERVICE="Docker registry"
- REGISTRY_AUTH_TOKEN_ISSUER="Auth Service"
- REGISTRY_HTTP_SECRET=secretkey
- REGISTRY_AUTH_TOKEN_ROOTCERTBUNDLE=/certs/auth.crt
- REGISTRY_LOG_LEVEL=debug

为了实现registry与业务系统的集成,我们配置registry auth的实现方式为token

1
2
3
4
5
6
auth:
token:
realm: http://172.16.137.217:8080/auth
service: Docker registry
issuer: Auth Service
rootcertbundle: /certs/auth.crt
  • auth.token.realm: auth server用于认证的Endpoint地址
  • auth.token.service: 用于请求auth server的携带的service名称
  • auth.token.issuer: registry信任的auth server名称
  • auth.token.rootcertbundle: 用户验证token签名的公钥文件

其中auth.crt为使用openssl生成的公钥文件,用于registry验证token的合法性

以以上配置为例,我们来看看registry与auth server的实际交互过程:

例如当用户尝试向registry push镜像samalba/my-app时,为了完成当前操作,用户需要对repository samalba/my-app具有push的权限,registry将会返回401 Unuthorized信息

1
2
3
4
5
6
7
8
9
HTTP/1.1 401 Unauthorized
Content-Type: application/json; charset=utf-8
Docker-Distribution-Api-Version: registry/2.0
Www-Authenticate: Bearer realm="http://172.16.137.217:8080/auth",service="Docker registry",scope="repository:samalba/my-app:pull,push"
Date: Thu, 10 Sep 2015 19:32:31 GMT
Content-Length: 235
Strict-Transport-Security: max-age=31536000

{"errors":[{"code":"UNAUTHORIZED","message":"access to the requested resource is not authorized","detail":[{"Type":"repository","Name":"samalba/my-app","Action":"pull"},{"Type":"repository","Name":"samalba/my-app","Action":"push"}]}]}

其中需要注意的内容是:

1
Www-Authenticate: Bearer realm="http://172.16.137.217:8080/auth",service="Docker registry",scope="repository:samalba/my-app:pull,push"

这里registry告诉docker client你需要从http://172.16.137.217:8080/auth获取认证信息,并且携带请求参数service以及scope

返回信息根据用户设置的auth配置产生

Docker Client提供用户输入用户名和密码后向auth server的Endpoint发送请求:

1
http://172.16.137.217:8080/auth?service=Docker registry&scope=repository:samalba/my-app:pull,push

同时在http head中包含用户相关的登录信息

1
authorized: Basic YWtaW46cGzc3dvmcQ=

此时我们自己实现的auth server只需要从http head中通过base64获取登录的用户名和密码,并且验证登录信息的合法性,同时根据业务数据返回用户的实际权限(pull, push)即可.

基于JWT协议规范使用私钥对返回内容签名生成相应的Token即可。

1
2
3
4
HTTP/1.1 200 OK
Content-Type: application/json

{"token": "eyJ0eXAiOiJKV1QiLCJhbGciOiJFUzI1NiIsImtpZCI6IlBZWU86VEVXVTpWN0pIOjI2SlY6QVFUWjpMSkMzOlNYVko6WEdIQTozNEYyOjJMQVE6WlJNSzpaN1E2In0.eyJpc3MiOiJhdXRoLmRvY2tlci5jb20iLCJzdWIiOiJqbGhhd24iLCJhdWQiOiJyZWdpc3RyeS5kb2NrZXIuY29tIiwiZXhwIjoxNDE1Mzg3MzE1LCJuYmYiOjE0MTUzODcwMTUsImlhdCI6MTQxNTM4NzAxNSwianRpIjoidFlKQ08xYzZjbnl5N2tBbjBjN3JLUGdiVjFIMWJGd3MiLCJhY2Nlc3MiOlt7InR5cGUiOiJyZXBvc2l0b3J5IiwibmFtZSI6InNhbWFsYmEvbXktYXBwIiwiYWN0aW9ucyI6WyJwdXNoIl19XX0.QhflHPfbd6eVF4lM9bwYpFZIV0PfikbyXuLx959ykRTBpe3CYnzs6YBK8FToVb5R47920PVLrh8zuLzdCr9t3w", "expires_in": 3600,"issued_at": "2009-11-10T23:00:00Z"}

当docker client获取到token之后,client会将得到的token作为http请求头信息再次尝试访问registry,registry使用公钥解密并验证token内容,并根据token包含的权限信息完成实际的操作

如何生成符合Docker Registry规范的Json Web Token详解

生成用户加密的公私钥

1
2
3
4
5
6
7
8
9
10
11
12
13
14
15
16
17
18
19
20
openssl req -newkey rsa:4096 -nodes -sha256 -keyout auth.key -x509 -days 365 -out auth.crt
Generating a 4096 bit RSA private key
................................................................................................................................................................................................................++
........................................................................++
writing new private key to 'auth.key'
-----
You are about to be asked to enter information that will be incorporated
into your certificate request.
What you are about to enter is what is called a Distinguished Name or a DN.
There are quite a few fields but you can leave some blank
For some fields there will be a default value,
If you enter '.', the field will be left blank.
-----
Country Name (2 letter code) [AU]:DE
State or Province Name (full name) [Some-State]:Example State
Locality Name (eg, city) []:Example City
Organization Name (eg, company) [Internet Widgits Pty Ltd]:Example Company
Organizational Unit Name (eg, section) []:Example Organizational Unit
Common Name (e.g. server FQDN or YOUR name) []:auth.example.com
Email Address []:admin@auth.example.com

此时我们将得到两个文件加密文件auth.cert和auth.key

Docker Registry端

auth.cert对应docker registry的auth.token.rootcertbundle配置项,用户验证docker client请求时提供的token是否合法

1
2
3
4
5
6
auth:
token:
realm: http://172.16.137.217:8080/auth
service: Docker registry
issuer: Auth Service
rootcertbundle: /certs/auth.crt

Auth Server端

当Auth Server拦截到到认证请求

1
http://172.16.137.217:8080/auth?service=Docker registry&scope=repository:samalba/my-app:pull,push

根据请求信息验证授权完成之后,我们将根据以下规则生成json web token内容。

生成token主要由3个部分组成:

  1. 生成jwt的Header信息
1
2
3
4
5
{
"typ": "JWT",
"alg": "ES256",
"kid": "PYYO:TEWU:V7JH:26JV:AQTZ:LJC3:SXVJ:XGHA:34F2:2LAQ:ZRMK:Z7Q6"
}
  • typ: 当使用JWT时,typ固定为“JWT”
  • alg: 对应私钥文件的加密方式,本示例中即对应auth.key文件的加密方式,可以通过代码读取私钥文件获取
  • kid: 根据docker提供的规则生成公钥文件的kid,registry会根据同样的算法获取公钥的kid,如果匹配失败则认证失败
1
2
3
- Take the DER encoded public key which the JWT token was signed against.
- Create a SHA256 hash out of it and truncate to 240bits.
- Split the result into 12 base32 encoded groups with : as delimiter.

对于基于golang开发的同学而言可以直接使用https://github.com/docker/libtrust/blob/master/key.go提供的KeyID方法获取公钥的keyid

  1. 设置jwt的payload信息Claim Set
1
2
3
4
5
6
7
8
9
10
11
12
13
14
15
16
17
18
19
20
21
{
"iss": "Auth Service", //需要注意必须与auth.token.issuer配置保持一致
"sub": "some id", //根据业务系统的规则自定义生成即可
"aud": "Docker registry",// 从请求的service参数获取
"exp": 1415387315, //过期时间
"nbf": 1415387015, // not before 可选参数
"iat": 1415387015, // 正式发行时间
"jti": "tYJCO1c6cnyy7kAn0c7rKPgbV1H1bFws", //随机生成即可
// access根据请求的scope获取,当然业务系统要判断用户的实际权限并在actions中放回
"access": [
{
"type": "repository",
"name": "samalba/my-app",
"actions": [
"pull",
"push"
]
}
]

}

3,最后使用auth.key私钥进行签名

1
2
3
4
5
RSASHA256(
base64UrlEncode(header) + "." +
base64UrlEncode(payload),
'auth.key file content'
)

从代码来看应该更容易理解

1
2
3
4
5
6
7
Map<String, Object> header = getJWTHeader();
Map<String, Object> claims = getJWTClaims();

return Jwts.builder()
.setHeader(header)
.setClaims(claims)
.signWith(SignatureAlgorithm.RS256,getPrivateKey());

代码实现简化版

添加Endpoint用于响应docker client认证请求

1
2
3
4
5
6
7
8
9
10
11
12
13
@RestController
public class RegistryAuthController {


@Autowired
private RegistryAuthServer registryAuthServer;

@RequestMapping("/auth")
public ResponseEntity auth(final HttpServletRequest request) {
return ResponseEntity.ok(registryAuthServer.auth(request));
}

}

添加RegistryAuthServer实现授权验证以及生成Token令牌

备注:作为示例keyid我们直接使用docker提供的libtrust库从公钥文件生成,另外代码中的硬编码,字符常量请忽略~just demo..

1
2
3
4
5
6
7
8
9
10
11
12
13
14
15
16
17
18
19
20
21
22
23
24
25
26
27
28
29
30
31
32
33
34
35
36
37
38
39
40
41
42
43
44
45
46
47
48
49
50
51
52
53
54
55
56
57
58
59
60
61
62
63
64
65
66
67
68
69
70
71
72
73
74
75
76
77
78
79
80
81
82
83
84
85
86
@Component
public class RegistryAuthServer {

public RegistryTokenResponse auth(HttpServletRequest request) {
String token = getDefaultJwtToken(request.getParameter("client_id"),
request.getParameter("service"),
getAccess(request.getParameter("scope"))).compact();
return new RegistryTokenResponse(token);
}

private List<AccessScope> getAccess(String scope) {
return Strings.isNullOrEmpty(scope) ?
Collections.EMPTY_LIST : Collections.singletonList(new AccessScope(scope));
}

private JwtBuilder getDefaultJwtToken(String clientId, String service, List<AccessScope> access) {
try {
return Jwts.builder()
.setHeader(getJWTHeader())
.setClaims(getDefaultClaims(clientId, service, access))
.signWith(SignatureAlgorithm.RS256, getPrivateKey());

} catch (Exception e) {
throw new ServiceRuntimeException(e);
}
}

private Map<String, Object> getDefaultClaims(String clientId, String service, List<AccessScope> access) {
Map<String, Object> claims = new HashMap<>();
claims.put("access", access);
claims.put("iss", "Auth Service");
claims.put("sub", clientId);
claims.put("aud", service);
claims.put("exp", new Date(DateTime.now().plusDays(7).getMillis()));
claims.put("iat", new Date());
claims.put("jti", "jwtid");
return claims;
}

private HashMap<String, Object> getJWTHeader() throws Exception {
PrivateKey privateKey = this.getPrivateKey();
HashMap<String, Object> header = new HashMap<>();
header.put("typ", "JWT");
header.put("alg", privateKey.getAlgorithm());
header.put("kid", getPublicKeyId());
return header;
}


protected PublicKey getPublicCertKey() throws Exception {
byte[] keyBytes = DatatypeConverter
.parseBase64Binary(new String(formatPublicKey("auth.crt").getBytes(), Charset.forName("UTF-8")));
return CertificateFactory.getInstance("X509").generateCertificate(new ByteArrayInputStream(keyBytes)).getPublicKey();
}

protected PrivateKey getPrivateKey() throws Exception {
java.security.Security.addProvider(new org.bouncycastle.jce.provider.BouncyCastleProvider());
byte[] keyBytes = new Base64().decode(formatPrivateKey(getResourceBytes("auth.key")));
return KeyFactory.getInstance("RSA").generatePrivate(new PKCS8EncodedKeySpec(keyBytes));
}

private String formatPrivateKey(byte[] keyBytes) throws UnsupportedEncodingException {
return new String(keyBytes, "UTF-8")
.replaceAll("(-+BEGIN RSA PRIVATE KEY-+\\r?\\n|-+END RSA PRIVATE KEY-+\\r?\\n?)", "");
}

private String formatPublicKey(String resources) throws IOException {
return new String(getResourceBytes(resources), "UTF-8")
.replaceAll("(-+BEGIN CERTIFICATE-+\\r?\\n|-+END CERTIFICATE-+\\r?\\n?)", "");
}

private String getPublicKeyId() {
return "MXNV:KLDD:GEH3:DWME:7CTG:E2HZ:QJDM:LJXI:35NL:FZZ3:LPE2:IOKY";
}

private byte[] getResourceBytes(String publicCertKeyFileName) throws IOException {
ClassPathResource classPathResource = new ClassPathResource(publicCertKeyFileName);
File file = classPathResource.getFile();
FileInputStream in = new FileInputStream(file);
byte[] keyBytes = new byte[in.available()];
in.read(keyBytes);
in.close();
return keyBytes;
}

}

参考资料